It's the Year of the 40th's...
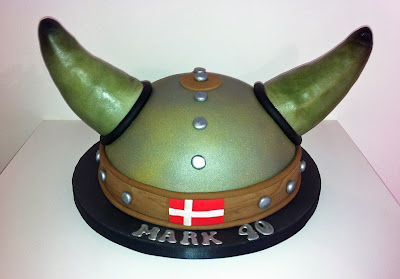
My lovely big brother will turn the big four-oh in June which means his school mates are turning 40 this year too and so I had the pleasure of making a Viking Helmet Cake for Mark's aforementioned 40th birthday.
I was pretty excited about this one but didn't fully take into account the logistics of attaching rice crispie cake 'horns' to a chocolate sponge 'helmet' before setting about the task... and if I'm honest the whole experience very nearly finished me off... but as I'm writing this you can assume I lived to tell the tale...
[Here comes the all too regular lack of photos apology...]
Sorry, really should've taken some photos of my progress along the way but as ever I didn't think of it until the chances had passed, so you'll just have to imagine what the photos would've looked like if I had taken some if that's ok?
Sooo... just in case anyone's wondering...
First, I modeled the horns using rice crispie cakes* (you can get the recipe and details here) onto plastic cake dowels and let them set in the fridge for half an hour or so; then I smeared them in buttercream to avoid a bumpy rice crispie texture and finally wrapped them in fondant and left them to set (cleverly propping them up in the middle of a couple of rolls of kitchen towel!). Once the icing had set I airbrushed them both and popped them back into their kitchen roll nests to dry again.
After carving and covering the chocolate cake, I used a fabulous favourite of mine, the PME Lustre Sprays, to colour it... using both silver and gold as I couldn't decide which would look best...typical Libran!
Once I'd added the details to the helmet I tentatively spiked the 'dowel-mounted' horns into the cake and prayed... unfortunately the universe wasn't paying attention at that moment in time and the horns decided to pay attention to that fiddly gravity type thing and started sinking through the cake!!! Argh!!!!!!! I should probably add that this was all happening 1 hour before delivery... and I had to fight my way back from the verge of tears before continuing.
1 hour and counting and I had to totally rethink these horns. I just couldn't think of a way to support them until I remembered a handy hint that I'd read about a year or so before, and used just the once. I personally think it's a sneaky little trick and I love it!!
Basically, you water down fondant icing to the consistency you need, in this case cement/tiling grout, and liberally slap it on the spot you need it and stick!!! Simple!!
I added some extra support around the base of the horns with some sausage shaped fondant icing, supported the whole lot with those big fat air filled packaging things and stepped away!
Phew! The horns and their helmet made it to delivery and the birthday boy loved his cake!! Success!!
Here's Marks cake...
HAPPY 40th BIRTHDAY MARK!!!
* Known as RCC's in the trade ;)


No comments:
Post a Comment